I wanted to be able to fight large battles and so was attracted to 6mm for that very reason, now I didn't want to replicate what I already had in other scales, so that counted out Napoleonic's, War of the Roses, Hundred Years War so my attention turned to the American Civil War. This had small skirmishes through to huge engagements such as Gettysburg, was it possible to recreate such a battle on my table? I intended to try.
Having always being fascinated by that conflict and already quite well read on the subject, I basically knew what I wanted to do. A few rule sets have been read including, Polemos (provided by Baccus with their starter box set), Altar of Freedom and its supplements (my current favourite) plus I am also play testing a set of rules written by a fellow You Tuber, 'Officer Commanding.' These were written with 2mm in mind, the aim being to be able to re fight the largest battles on a board measuring just one foot square! Amazing, but true. I scaled up the battle area to 2 x 2 feet for use with my 6mm troops and the game played really well. A set of videos showing the battle from start to finish is available on my YT Channel.
After a comment regarding the 6mm buildings laid out as a small town, I have posted a few more photos to show what can be achieved. They are laid out on a Cigar Box Battle Mat with a few trees from 4Ground and others dotted about too.


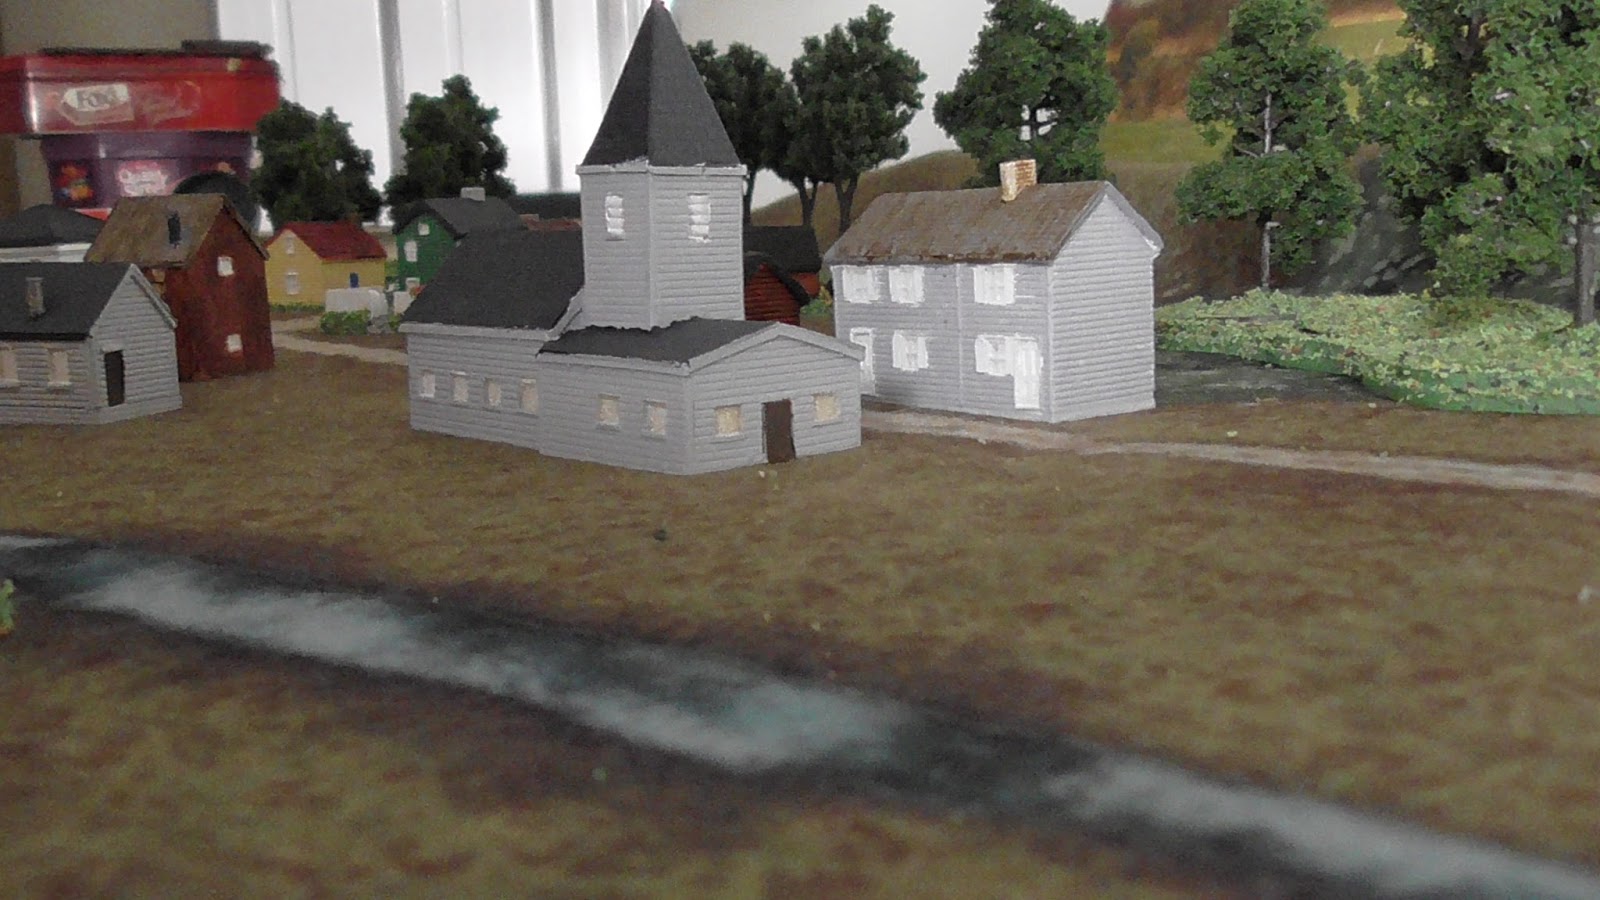


I think you will agree the town looks quite impressive if a little bereft of town folk, but I am hoping to change that, the back scene is a model railway poster of English countryside but I hopefully I manage to get away with it.
Work commenced on the mountain of metal purchased at Sheffield, the whole painting job laid out in the first photograph.

I needed some more units of cavalry as the starter box only came with two for each side.
 I painted up three more for each side giving me a total of five now for both forces.
More units of infantry were also started to bolster my forces.


Also an experimental casualty marker, made from a cut down lollipop stick and I used Polyfilla (Spackle?) to create a small cradle for the tiny 5mm die, you only have to look at one and it rolls away. A confederate infantryman lies where he fell!

More casualties, both infantry and cavalry followed and they will get similar bases.

Started also to paint up a test piece of the artillery limber and horse teams to go with my guns provided in the starter set without limbers.

Once the limbers and teams were completed I married them up with their respective artillery pieces.


Next up was the start of a baggage train, consisting of two wheel carts with loads, a pair of covered wagons and mule teams.

The air turned blue on a couple of occasions whilst trying to glue on those tiny wagon wheels!

Happily the carts came with wheels already moulded on.

Mule teams came with some drovers to keep them moving.


Finally for today's post, the first unit of archers and bill men for the 28mm WotR project are almost complete. I have based them on the Renedra plastic bases that come in the box set. The archers in on block of four, one block of two, and two single bases. This will allow for figure removal if the rule set calls for it.


The bill men are in a block of two and two singles.


OK, I shall leave it there for today, I am aware it is quite a long post and I don't wish to bore you. More tomorrow...Ian
Excellent. You have accomplished so much! What a wonderful hobby it is. Great work Ian. Keep it going.
ReplyDeleteAlso, you can also make use of wooden match sticks to make little dice holders. Simply cut little pieces from the stick and glue in place on your pop-stick to make a nice little square to hold the die in place. :)
Thanks Kurtus, I will give the match stick idea a try, should be a lot less messier that my current system.
ReplyDelete